Featured Post Today
print this page
Latest Post
Showing posts with label trick|computer. Show all posts

What is Runtime Error r6034 and How to Fix It?


I’ve been using Picasa 3.9.137 for Windows 7 for several years without mishap until a week ago, when my once reliable PC suddenly malfunctioned.

When it started up or Windows rebooted, my PC showed an error message on its screen. Titled Microsoft Visual C++ Library, the message shows Runtime Error r6034, and informed me that an application had failed to load the C runtime library correctly.

“An application has made an attempt to load the C runtime library incorrectly. Please contact the applications’ support team for more information”.
I uninstalled and reinstalled Picasa but doing so did nothing that could help me with correcting the error, so I searched online for how to fix my problem. I refused to throw away my beloved PC just yet.

Luckily, after looking feverishly for several minutes for a way to fix my computer, I not only learned what this errror r6034 is but also how to fix it.You could only imagine the stress I felt while looking for a way to fix my computer.  How could I work while my PC was broken?

I believe such a misfortune shouldn’t happen to anybody,In my case it was Picasa but you may face this error with any XYZ Application. so here’s what I learned about this Error.


What is Runtime Error r6034?


Believe it or not, it is a common kind of computer error.


As I’ve described it already, this computer error

The issues that can cause this error  are: Appears on the screen as a message box. It informs the user of the error and that gives him a definition of what the error is.

In other words, it tells the user that an error has occurred and describes it to him.

  • Software issues

  • Application conflicts

  • Memory usage faculty

  • Conflicts between the Terminate and Stay Resident programs


How Do I Fix a Runtime Error r6034?


There are several ways of fixing this troublesome error, and they are all relatively easy to learn.

Here are the do-it-yourself (DIY) ways:

  • Run a Full Registry scan, Use third Party Software to do it and repair registry

  • Disable all the Startup applications

  • Rename all the dynamic link library (DLL) files on your computer

  • Re-install Picasa or iTunes or any XYZ program and other related programs

  • Start your system in safe mode.

Here are the ways where you would need help or that would require you to use certain software:


  • Use a reputable antivirus software tool to remove any viruses that might have infected your computer

  • Repair your registry entries.

Maintaining your computer isn’t rocket science. It requires only time and your patience. While you might find learning things about your computer, like what is a runtime error r6034 and how to fix it, a hassle, knowing them might just determine how your precious computer could last. With no one there to help you and no idea how to deal with it, what are you going to do when, for example, the dreaded ‘blue screen of death’ appears on the screen?

Source from http://www.smarttricks.net

How to Speed Up Chrome Browser Easily


Today I will be Sharing some cool tricks and tweaks by which you will be able to Speed up Chrome browser. Do you know that experts which are sitting at future mark says that Google chrome is one of the fastest internet browser. Rightly said, As you have already experience while using google chrome that it really works faster and smoother compared to other internet browser. Google chrome uses DNS prefetching and speedy (SPDY) protocols instead of simply using HTTP. These DNS prefetching and SPDY protocols load up your page in advance so that you need not to wait for more time.

Speed Up Chrome

But It happens many times that google chrome starts working very slow and believe me that  is very frustrating. But you need not to worry any more because listed below are some nice tricks to speed up chrome browser


 How to Speed Up Chrome Browser ?


1. Disable plugins


I can bet you that you are using many plugins which are generally not in your use. To work faster and smoother on your chrome browser you must have some selected plugins installed. Too much plugins can slow up your browsing speed. Follow the steps below and start removing your extra plugins from your browser.

1. Open your chrome browser and go to the following address

chrome://plugins/

2. Uncheck the plugins which are not in your use. You can also delete these plugins unwanted plugins. Understand that you may not be able to delete or uninstall these plugins,you can only disable them

Note: Be very careful while unchecking or deleting your unwanted plugins because there are many plugins which are responsible for the performance of your browser. You may not want to disable plugins like flash because many web sites use flash to display web pages.

2. Disable Extensions


You might wonder if Plugins and extensions are almost similar to each other?  Plugins are usually a third party programs which are needed to enhance the speed and performance of your browser but other than this extensions are specifically needed for browsers.

These Extensions really slows up your browser and can affect your browsing speed very badly. To avoid this thing you just need to follow the below steps carefully :-

1. Open your chrome browser and type the following address in the address bar

 chrome://extensions/

OR

To check the full list of extensions installed in your browser, simply Click on Wrench icon on your toolbar, navigate to Tools and then click on Extensions.

2. You will now going to see an extensions list which is supporting your browser.

3. Simply uncheck the extensions which are not needed or just delete those extensions which are not needed in future.

You will surely see some changes in your browsing speed as you delete those extensions from your browser.

3. Clear your browsing data


You already know that if you browse any website, chrome automatically collects the cached text, cookies and other kinds of website data. That is why when we click again on that website address it consumes less time for loading that web page.

Although cached and cookies are really made to speed up chrome browser but sometimes it happens that they are responsible for decreasing your browsing speed and lagging.

Following steps will be helping you in clearing your browsing data:-

1. Click on Control and customize chrome button or Wrench icon as i mentioned earlier.

2. Choose Tools > Clear browsing data.

3. Simply, choose the time range and other types of  extra features which are listed below in that dialog box, hit Clear browsing  data.

That’s all. I Hope you this article will some what help you clear your question how to speedup chrome browser?  if you face any type of problem or confusion after reading this article you can surely leave a comment below in the comment box.

Source from http://www.smarttricks.net

How to Clear Cache in Chrome – Super Fast way


As you already know that google chrome is one of the fastest browser for using different internet services but do you know why? Chrome automatically stores many types of website data when you open any website and that’s the reason why it takes less time compared previously for loading your webpage.

But as google chrome stores website data for quick loading then it is also possible that chrome can get slower because of storing too much data and believe me guys when it happens it is the worse thing ever. the Cache helps to speedup browsing but slow downs the Broswer, So here is a Step by Step guide on How to Clear Cache in Chrome and make your browser faster then before.

In this guide you will learn 2 ways to clean cache in chrome. The Default way and The Fast way, So do not miss to Check Both the methods.


How to Clear Cache in Chrome Default Method


Step 1.  First of all Open your Google Chrome browser.

Step 2. Then click on Customize and control Google Chrome button on the top right corner.

Step 3. Select History option. You can also press CTRL + H for opening this menu box directly.

How to clear cache in chromeStep 4.  After performing the above steps choose Clear browsing data option for clearing your recent web files and other browsing data.

Step 5.  Now carefully choose the time period and check or uncheck the options in the menu.

At the last simply click on Clear Browsing Data and that’s all and this How to Clear Cache in Chrome.  Your all type of recently used websites and web data will automatically be removed after pressing this option. If you have confusion regarding the above steps then you can simply press CTRL + Shift + Del button and then clear your all browsing data.

All types of Cookies, Cached plugin data, passwords, form fills and other type of app data will be flushed from your browser.


How to Clear Cache in Chrome Fast


You can also prefer using different types of extensions which are available online for chrome browser. With the help of these extensions user will able to clear the browsing history just by one click. Here I have mentioned some of the best extensions that you can use for your chrome browser.

1. Cache killer


There are lots of extensions which are available for cleaning your cached plugin data in your chrome browser. Cache killer is counted in one of the most simply used extensions for chrome browser. This extension is so simple that it can be easily controlled with just one click.

After you have successfully installed and enabled this plugin on your chrome browser then it will help you by automatically erasing your cache plugin data. Not only this but you can also able see the latest version of the websites with the help of this useful extension.

2. Clear Cache


This extension contain many amazing features which can allow you in removing your browsing data which generally contains downloads,cookies, cache, history,form fills, and other type of storage.

If you compare this extension to cache killer then you will find that this extension is more useful. You just have to click the icon of Clear Cache and then it will automatically flush you browsing data.

3. OneClick Cleaner


Like all the extensions discussed above One Click Cleaner also performs the same work. With the help of this extension user can clean up the whole google chrome browser with just one click. One Click Cleaner contains many type of options for clearing your browsing data.

Whenever you find that your browser is working slow then simply use this extension and clear your all type of cache plugin data to speed up your chrome browser again.

You just learned 2 Methods on topic How to Clear Cache in Chrome, This guide not only helps you to clear cache in chrome but also clears cookies and browsing history.

[alert style="e.g. white, grey, red, yellow, green"] Note:You should always try to clear your google chrome cached data after every use because it is the best way by which you can speed up your chrome browser. If you are doing this process regularly then you can surely enjoy your internet services without any type of issues. [/alert]

Hope, you have enjoyed this article while reading. If you have any type of confusion or problem regarding the above content then you can leave your comment below and express your problem.

Source from http://www.smarttricks.net

Error 651 – Methods to Fix it in Windows 7/8

If you are a windows user then it is possible that you have Face Error 651 Anytime.

There are many windows user who get affected by this error code 651 while working online.

If you are one of those windows user, then keep reading this article and carefully read out the following Detailed solutions which I have gathered after researching various websites, articles, forums etc.

So, without consuming more time I’ll directly come over the main point of this article.

Error code 651 usually occurs when user tries to connect it’s broadband in windows 7 operating system. It shows a message that Your modem (or other connecting devices) has reported an error and Usually the message will be “Connection failed with error 651” .Fix Error 651

In such cases user tries to restart the whole computer, router or modem and if this solution doesn’t work then he/she tries to find the solution online but its rare that they find out the solution as they cannot get online.

You can easily make out when you are facing this problem in your windows 7 as this error code 651 shows an error message when user is working online.


How to Fix Error 651 in Windows


There are  ofcourse lots of suggestions and solution available online to solve Error 651 Error but let me tell you that there is no official solution available online or guarantee for fixing this problem in windows 7. So, for helping out those users I have tried to gathered all types of solution which can help you out in solving this problem on your windows 7 operating system.

1. Uninstall Modem


By uninstalling the modem user can solve this problem. This solution is Most Common to get rid of Error 651. Its applicable for all type of dial up modems. There are many people who had solved out this problem by this method.

2. Replace raspppse.sys from windows 7 drivers directory


I have seen that many users has successfully solved this problem by replacing the raspppse.sys file from the windows 7 directory. This method will only work for those users who are currently using windows 7 operating system and are facing this problem.

3. Disable IPv6 for your internet connection


User can also solve this problem by turning off the IPv6 for their dialer modem. This is one of the most easiest way for solving out this problem successfully. Right click on the Connections, Select Properties, Then Uncheck the box which says Internet Protocol Version 6 (TCP/IPv6).
 

5. Disable Windows 7 auto tuning feature


There are many people who suggested that by turning off the auto tuning feature we can solve out this problem. This method is useful for only those users who are using router. To Disable Auto tuning follow the below steps.

  • Start command prompt as administrator.


  • Type in the below command and Press Enter


“Netsh interface tcp set global autotuning=disabled”

6. Reinstall LAN card drivers


It have seen that by reinstalling the LAN card driver Error 651 problem can be solved. Sometimes it is possible that drives may get corrupted and this is the reason by I will suggest you to install your drivers again.

7. Performing Clean Boot


Performing clean boot can help the user in finding the root cause of this problem. If there is no problem in your windows services then this method will not be working for you.

8. Recreate Dialer and Restart ADSL modem router


It is possible that your internet modem could get hanged during the connection. By removing the dialer and then creating the new dialer can help the user a lot. Restarting ADSL modem/router can also work during such type of cases.

Overall Verdict on Fixing Error 651


So, these are the solutions which I have found while researching to Solve the Error 651 Windows Error . If you are facing this problem in your windows 7 Pc then I will strongly recommend you to try these methods once.

Hope, you have liked the above article. If you face any type of problem after reading the above article carefully then you can surely leave your comments below in the comment box. Also if you have liked anything about the above article then kindly share this article with your friends to help them too…  :)

Source from http://www.smarttricks.net


Retrieve Deleted Facebook Messages,Photos and Videos

Hey guys apologize for not updating Smarttricks with Fresh Content Regularly in Recent times. But there is a Good News, because i am back with yet another Facebook Trick. Today we will see How to Recover deleted facebook messages,Photos and Videos and much more on facebook.

Basically its a Facebook Feature which not many people are aware of and hence i will be writing this tutorial to let you guys know about this amazing feature/Trick that Facebook Provides.

Retrieve Deleted Facebook Messages

Many a times We Delete Messages,Photos or Vidoes from our profile which is not intentional but once we do , we can not undo it. and its gone forever.

But wait, There is a saying: Nothing is Lost, until MOM can’t find it, Likewise in this case even if you delete anything from your facebook account, you can get it back. Facebook have all your data in their archive which you can download too.

Retrieve Deleted Facebook Messages,Photos and Videos


Follow the Below simple steps to Know how you can get back and have access to your deleted messages, photos,Videos and all other data of your facebook profile.

Step 1: First of all,You will have to Click here to open Facebook General account Settings.
 

Step 2: Once you open your general settings, you will see Download a Copy of your Facebook Data, So click on it to.

Step 3: On the Next page you will see a Download Archive Button, Click on it and you will be prompt to enter your Password to Continue, This is a Security Step by Facebook.

Step 4: After entering your Facebook Password, Click on Submit, On the next screen you will be shown that the download link for your data will be sent to your email id which you used to create your facebook account.

Step 5: Wait for Few Minutes, check your mail. You will see a mail from facebook in your Inbox with Downloading link ready for you to download all your data.

Retrieve Deleted Messages,photos and videos on facebook

Step 6: Now After downloading the file. Unzip it and open the folder where you will find your messages, photos, vidoes. Pokes, Friend list etc.

The Files will be in .html format so you will have to double click on the file and select your Favourite Browser to open the file, the File will open up in your browser where you will have access to all your data..

I Hope this guide will help someone or other who didn’t already know that you can actually Retrieve Deleted Facebook Messages,Photos and Videos. Don’t forget to Share it with your friends if you like it and you may even Subscribe for New post, to get directly in your mail inbox.


Source from http://www.smarttricks.net

Movavi Converts Videos at Unbeatable Speed

Movavi Was Established in 2004 and Since then They have Produced many Amazing Programs for Windows and MAC users. Recently i tried my hands on one of thier Program Called Movavi Video Converter.

Movavi Video Converter is a Video Conversion Software that can Convert any kind of Video at High Speed. The Good Guys at Movavi Claims that their Video Converter Converts video 79 Times faster.  After Using The Software i was amazed to see the Conversion Speed that this magical tool Converted my video.  No Doubt, the Conversion speed is Exceptional and they Provide the speed that they claim.

Video Conversion Software

Movavi Supports almost all Video/Audo Formats. I personally checked AVI, MP4, 3GP, FLV, MPEG, MPEG-TS, MKV, WMV, SWF, ASF, WebM, OGV, RM, WTV and they all were supported by Movavi without any trouble. If this Wasn’t Enough, I even found that Movavi video converter can also Trim your video with great speed.

After Experiencing the Video Conversion Speed and Supportive file Formats,  I was a Bit Skeptical about the Output Quality that this tool will Generate. i was in belief that the Quality of output video will not be Good. But hey, i was Wrong. The Output Quality of my Converted video was of Top Notch.

Many a times, Tools like this Tends to Crash while running, But Movavi Video Converter did not gave me a chance to critic on this topic.

Overall Conclusion is that this tool is amazing to Convert Videos in High Quality and amazingly Fast Speed.  Almost All File Format Support, Speed and Very User friendly Interface will Grab your Attention.


Source from http://www.smarttricks.net

How to Enable Copy paste in CMD – Windows

By Default Windows do not allow users to Copy text and Paste it in Command prompt Or Copy text from Command prompt and paste it elsewhere. But there is an option in CMD itself to enable Copy & Paste Text in Windows Command Prompt.

Today in this tutorial we will learn how to Enable Copying and Pasting Texts in Windows Command prompt. One of the main advantage of this will be that you can copy any command that you find on the internet or from any word/excel file and paste it directly in CMD and execute that command just like that.

How to Enable Copy Paste in CMD


Step 1: Open CMD, Just type CMD in search or Press Win + X key to select Command Prompt.


Step 2: Right Click on the Title of the CMD window and Select Properties just like its shown in the below Picture


Enable Copy paste in CMD


Step 3: You will see a Pop up Window coming up, Now on the Right hand side, Under Edit Options, Just Check Quick Edit Mode and click OK


Step 4: Everything is Done, Now just Copy any Text from Here or Anywhere else Using CTRL + C keys and just Right click using your mouse on CMD. You will see that the text is been pasted automatically in CMD. Please Understand that Using CTRL + C to Copy text is Important.


Likewise if you wish to Copy Text from CMD to paste elsewhere then Just Select the Text in CMD and Again just Right Click with the mouse. Your Text is Copied and ready to Paste it in any Document you want.


This Doesn’t Limit you to just Text you can even copy File or Folder path and paste it in CMD. Everything that you have to type manually can be copied from somewhere and pasted directly to CMD with this small Tweak


So this was just a small Tip I wanted to Share with my Readers so that you don’t have to Type any long Command in CMD which if typed incorrectly can cause errors. I hope this will help some Of you.


Source from http://www.smarttricks.net

How to hide Windows 7 Notification Area & System Clock

If you’d like to display a clean Windows 7 taskbar, you will have to hide the notification area and the system clock which appears on the right side if the Windows taskbar.

clean taskbar w7 400x177 How to hide Windows 7 Notification Area & System Clock

To hide the notification area or the system tray which appears in the right side of your Windows taskbar, type gpedit.msc in start search box and hit Enter to open the Group Policy Editor.

Navigate to User configuration > Administrative Templates > Start Menu and Taskbar.
 

Now double click on the entry Hide the notification area’ Select Enabled button, click Apply > OK.

You can also check out this freeware SysTray Hider which lets you do the same easily.

Hide Clock in Windows 7


To hide the System Clock, double click on the entry Remove clock from the system notification area. Select Enabled button, click Apply > OK.

To revert back to the default settings, you have to set it as Disabled or Not Configured.

You can also easily hide the system clock by the following method:

Right click System Clock > Customize notification icons > Turn system icons on/off.

Thats it!


Source fromhttp://www.thewindowsclub.com

Restrict access to Control Panel and and PC Settings in Windows 8.1

There may be times when you may want to prevent users from accessing the Control Panel in Windows. This post shows how you can restrict access to Control Panel and PC Settings in Windows 8 or Control Panel in Windows 7, using Group Policy setting and Registry Editor.

Restrict access to Control Panel


Using Group Policy Editor

Restrict access to Control Panel Restrict access to Control Panel and and PC Settings in Windows 8.1

If your version of Windows 8 has the Group Policy Editor, Run gpedit.msc to open it. Navigate to the following setting:

User Configuration > Administrative Templates, and Control Panel

In the right pane of Control Panel, double click/tap on Prohibit access to Control Panel and PC settings.
This setting disables all Control Panel programs and the PC settings app. It prevents Control.exe and SystemSettings.exe, the program files for Control Panel and PC settings, from starting. As a result, users cannot start Control Panel or PC settings, or run any of their items. It removes Control Panel from the Start screen and File Explorer, and removes PC Settings from the Start screen, Settings charm, Account picture and Search results. If users try to select a Control Panel item from the Properties item on a context menu, a message appears explaining that a setting prevents the action.
 

Using Registry Editor

If your version of Windows does not have Group Policy, you can use the Registry Editor to disable access to Control Panel and and PC Settings. To do so, Run regedit and navigate to the following registry key:
HKEY_CURRENT_USER\Software\Microsoft\Windows\CurrentVersion\Policies\Explorer

In the left pane, create a new DWORD (32-bit). Name it NoControlPanel and give it value 1. The following are the possible values and how they work:

  • 0 will enable Control Panel and PC Settings

  • 1 will disable Control Panel and PC Settings


NoControlPanel Restrict access to Control Panel and and PC Settings in Windows 8.1

After you prohibit access to Control Panel and PC settings, if any user tries to access them, they will receive the following error box:
This operation has been cancelled due to restrictions in effect on this computer. Please contact your system administrator.

Hope you are able to get it to work.

Visit this link, if you want to Hide, Show, Add, Remove Specified Control Panel Applets in the Windows operating system.

Source fromhttp://www.thewindowsclub.com


Prevent users from changing Password in Windows 8

There may be times when you may want to restrict or prevent users from changing Password in Windows 8. The reasons could be many – maybe you have two users using the same user account to log into Windows, and you do not one changing the password directly. Or you just simply do not want some user to change his password. In such cases, you can prevent standard users from changing their Password in Windows 8.1 or Windows 7, using Computer Management, Group Policy and Registry Editor.

Prevent users from changing Password


Using Computer Management

From the WinX Menu of Windows 8.1, open Computer Management. In the left pane, scroll down to System Tools > Local Users and Groups > Users.

Prevent users from changing Password Prevent users from changing Password in Windows 8

In the middle pane, you will see the list of user accounts on your Windows computer. Right the user name, on whom you want to apply this restriction and select Properties. The following window will open.

Prevent users from changing Password 2 Prevent users from changing Password in Windows 8

Here check the User cannot change password box and click on Apply.

Now if the user tries to change his password, he or she will receive the message Windows cannot change the password.

Using Group Policy Editor

From the WinX Menu, open the Run box, type gpedit.msc and hit Enter to open the Group Policy Editor.
 

remove change password Prevent users from changing Password in Windows 8

Navigate to the following setting:
User Configuration > Administrative Templates > System > Ctrl+Alt+Del Options

In the right pane, double-click on Remove change password and select Enabled.
This policy setting prevents users from changing their Windows password on demand. If you enable this policy setting,  the ‘Change Password’ button on the Windows Security dialog box will not appear when you press Ctrl+Alt+Del. However, users are still able to change their password when prompted by the system. The system prompts users for a new password when an administrator requires a new password or their password is expiring.

Click Apply and exit.

Using Registry Editor

If your version of Windows, does not have Group Policy, use the Registry Editor.

disable change password Prevent users from changing Password in Windows 8

Run regedit to open the Registry Edtor and navigate to the following registry key:
HKEY_CURRENT_USER\Software\Microsoft\Windows\CurrentVersion\Policies

Now in the right pane, right-click and select DWORD (32-bit) to create the key. Name  the new DWORD, DisableChangePassword. Double-click on it to edit its value. Now give it value data, 1.

You may be required to restart your Windows computer.


Source fromhttp://www.thewindowsclub.com

Manage and view saved passwords in Chrome browser

In this post, we will see how to manage and view saved passwords in Google Chrome web browser. Chrome will save your login usernames and passwords for the various  websites you visit. When you save them, it will automatically complete the sign-in fields for you the next time you visit the websites. Earlier, we have seen how we can manage Passwords in Internet Explorer using Credentials Manager- now let us see how to do it in Chrome.

Manage passwords in Chrome


Open your Chrome browser and from the top right Chrome menu button, select Settings. Alternatively, you can simply type chrome://settings in the address bar and hit Enter.

Scroll down and click on Show advanced settings. Now scroll down to the Passwords and forms section and click on the Manage passwords link.

Manage and view passwords in Chrome Manage and view saved passwords in Chrome browser

You will a list of all your saved passwords. The passwords will be hidden by asterisk marks. To see them, click on the Show link.

passwords in Chrome Manage and view saved passwords in Chrome browser

Chrome will ask you to enter your Windows login password. This is good security measure added by Chrome.

chrome passwords Manage and view saved passwords in Chrome browser
 

Once you enter it, you will be shown the password.

Here you manage and delete the saved passwords. When Chrome offered to save a password, if you clicked Never for this site, your password will not be saved and the site will be added to a list of passwords that are never saved. You can also remove any URLs you have saved in the Never saved list. Once you have finished, click on the Done button.

If you wish, you can sync the passwords to your Google Account, so that they are available on other computers you’re using. For this, you will have to be signed in, into your Google account.

Not many of you may know this. Google Chrome browser includes a built-in Password Generator, which can generate complex passwords for you. Go check out the built-in Chrome Password Generator … or perhaps you wish to use our freeware PassBox, or other desktop password manager or online password managers, to generate or save your passwords.

Learn how to manage saved passwords in Firefox here.


Source fromhttp://www.thewindowsclub.com

Review of Glasswire Network Monitoring Tool and Firewall

When writing about Wireshark network analyzer, I mentioned that it was among the best free network monitoring tool available for administrators to check the details of every device connected to the network. However, the interface of Wireshark is too complex for an average user and as the amount of data is high, it might often confuse such users. Glasswire, on the other hand, is a simple tool for network monitoring with a firewall built in for allowing/denying Internet access to apps. Read on this review of Glasswire to know more about another free network monitoring tool (free) and firewall.

Glasswire Network Security Monitor


The installation of Glasswire is clean and there is no fear of third party programs being installed. After installation, you can choose to run Glasswire before you click Finish or you can run it later using the desktop icon, Start Menu entry or if you opted to pin it to the Taskbar, you can start the program from there.

When the application is loaded, you get a window that provides you with basic information on how much data is being downloaded and uploaded along with some other options in form of icons, window tabs and a menu tab. The main focus of the main window is a graph that shows you data downloaded/uploaded vs time lapse. That is, the X axis of the graph is time as it passes by and the Y axis is the amount of data being uploaded and downloaded. Here is how the main window looks like.

Glasswire Review The Interface 400x307 Review of Glasswire Network Monitoring Tool and Firewall

The main window has a menu tab on the top-left corner that has options such as snooze, settings, Incognito etc. A system tray icon is also placed in the notification bar after successful installation of Glasswire. Right clicking the system tray icon also gives you the same set of options as clicking the menu tab on Glasswire window.

Another feature of the notification tray icon is that it provides you with information as and when a new app tries to connect to the Internet or when changes are made to the HOSTS file. The Snooze option mentioned above turns of the system tray notifications for a while.

The main interface has four window tabs: (1) For checking out the real time uploads and downloads, (2) Firewall, (3) Log and (4) Alerts. Each tab has its own options so that you can filter down the data to specific apps and protocols. The protocols option is labeled Traffic.

The Interface is simple and self-explanatory. If you still face problems understanding the interface, you can always access the Help option from the top-left menu bar.

Glasswire – The Graph Window


This is the main window that opens by default whenever you run the program. You can also set the program to run minimized upon boot using the Settings option in the top-left menu tab or by right clicking the system tray icon. In the latter case where you start program on boot, right click on the notification tray to see the window.

The default mode of data travel (Y) vs time (X) graph is set to all apps. The default view won’t show you protocols as in Wireshark. Clicking anywhere on the graph in Glasswire shows how many apps were using the network at the given time, in the bar just below the graph. It would be like app1 + 2more, followed by server IP addresses the apps are connected to. Clicking on items like 1more will show you more items that are using the network. Likewise, clicking on the IP address may bring up a drop down list showing what all server IP addresses are in use by the network.
 

Other than the default mode, there is an Apps Mode and a Traffic (protocols) Mode. When you select Apps view, the window is divided into two columns. The left column lists apps in use and the right column shows you data relevant to the app you highlight by clicking on it. Similarly, the Traffic view/mode will show you a list of protocols and when you click on a protocol, the right column of the window will show you amount of uploaded data and downloaded data plus IP addresses related to that protocol. Just click on any point of the graph in the right side and you will know which apps are using the protocol and what IP addresses are being used by them. The icons of apps make it further clear that which app is using which IP.

Glasswire – Firewall View


You may need admin privileges to make changes here. You can block any app from accessing the Internet. You can view what all apps are using Internet, the upload and download speeds as well as the server IP addresses they are using. Wherever possible, the server IP addresses are presented in URL format so that you can identify the servers. In some cases, they will be numbers that you can copy to browser and see where they lead.

Review of Glasswire Processwise Details in Firewall Mode 400x304 Review of Glasswire Network Monitoring Tool and Firewall

Alerts and Usage View in Glasswire


Alerts are the notifications that pop up in the system tray from time to time. If you have been away from your computer for a while, you can see the alerts/notifications in the Alerts view/tab. You can click on Mark as Read after reading the notifications on the Alerts tab. A number is displayed both in the system tray and the Alert tab to let you know how many notifications you have not viewed. When you click on Mark All As Read, the number is cleared. Basically, these alerts are about apps accessing the Internet for first time as well as changes made to the HOSTS files on your computer.

Activity Alerts in Glasswire 400x304 Review of Glasswire Network Monitoring Tool and Firewall

The Usage view is a big congested as it shows almost all data pertaining to all the apps that are using your network. It shows graphical representations in the left column: total data travelling, data going out and data downloading etc. The right column shows you apps, the protocols they are using and hosts IP addresses they are using.

Total Network Usage In Brief Glasswire Usage Tab 400x304 Review of Glasswire Network Monitoring Tool and Firewall

Glasswire Review – Conclusion


Though Glasswire does not delve deep into the network, it provides ample data to monitor your network and apps using the network. The software is easy to understand and the documentation completes whatever is left “not understood”. Both advance users and novices can use it without much problems. However, if have a big network and you want details of all devices at same place, Glasswire might not satisfy your needs. In that case, I recommend programs like WireShark Network Analyzer.

I wind up my review of Glasswire network monitoring tool and firewall here. Everyone has his/her favorite network monitoring tools if they are into monitoring. Please share yours in the comments section below. You can download Glasswire here.


Source fromhttp://www.thewindowsclub.com

How to sync Google Docs to your PC, Dropbox-style

Ever wish your Google Docs account could perform the same syncing magic that Dropbox does? Now it can.


Working within the Cloud using Google Docs is a great way to ensure that your content is available whenever you need it. Well, almost whenever, as there are some situations (power/Internet outage, Google services down temporarily, etc.) where relying on the Cloud can leave you stuck.
KumoSync is a tool that can prevent you from being stranded without your data. It works by syncing your Google Docs data to your PC (even your shared content), so you can work on your computer at work or home and have the changes uploaded for you automatically. Follow these seven steps to set the program up.
What you'll need:

  • Microsoft .NET Framework 3.5 or higher installed


  • A Google account


  • Microsoft Windows XP / Vista (32 & 64 Bit) / Windows 7 (32 & 64 Bit)


Begin by downloading and installing KumoSync. When exiting the installer, make sure the box is checked to load KumoSync immediately.
 

Step 1: Right-click on the KumoSync icon in the System Tray and select Settings.


Step 2: A new window will open with the Sync Mappings pane open by default. Click on New in the bottom right corner of this pane.

Step 3: Enter your Google account information in the window that appears.
(Credit: Screenshot by Nicole Cozma)

Step 4: Select a local folder that you'd like synced with your Google documents. You can also choose an entire drive.

Step 5: Make sure the box labeled Enabled is checked in the lower left-hand corner.

Step 6: In the pane to the left of the Settings window, select the Preferences option. If you want your Google Docs to be synced between the Google servers and your computer automatically, the sync interval can be adjusted where it says Sync Interval. If you wish to disable automatic syncing, simply remove the check from the box labeled Enable automatic synchronization.

Step 7: Click OK in the bottom right to finish the setup process.
If you chose to allow automatic syncing, KumoSync will do its thing once the appropriate amount of time has passed. To sync manually, whether you enabled auto-syncing or not, just right click on the KumoSync icon in the System Tray and select Sync.

Hide Your Recently Files And Programs From Start Menu.

Hello Guys. This is a General Computer trick for those who wants a privacy on Pc or on Laptops. Windows save list of recently opened files and show them in start menu. Its very convinient to find files. But if you wanna some privacy, if you don;t want others to see which files and programs you opened than you can hide recent files.
Hide Your Recently Files And Programs From Start Menu.


To remove recent items from start menu just follow these steps:

1). Right click on taskbar and click on Properties.

2). Click on start menu tab.

3). Uncheck the check boxes under privacy.
Hide Your Recently Files And Programs From Start Menu.


4). Click Apply and then OK !

Its done.

Click on start menu and check recent items and recent programs, they must not be in start menu.
Source fromhttp://computertrickworlds.blogspot.com

Hidden Themes In Windows 7

Hello my friends. Welcome to the Computer trick worlds ! This site is about computer tricks. All Different and interesting tricks are provided here.
Now When we install windows 7 , By default windows 7 provides only few themes.Shown like below
Hidden Themes In Windows 7


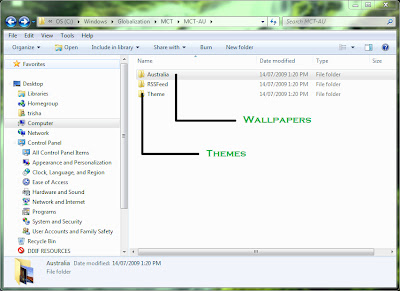
Let me tell you one interesting Trick , which is about hidden themes in windows 7. windows 7 provides us only few themes which are available for everyone But there are also some other nice themes and wallpapers in windows 7. which are Hidden. So here I will show you how to get those themes and apply to our windows 7.
so now follow only few steps which are shown below.
step 1 :

- Open My Computer.


Step 2 :


- Copy the below code.


" C:\Windows\Globalization\MCT"


- Dont include ""


Step 3 :

- Paste the code in addressbar of my computer.


Hidden Themes In Windows 7


Step 4:

- Now you can select any country and you can set your theme and wallpapers.


Hidden Themes In Windows 7


Step 5 :

Enjoy the new themes and wallpapers. :)


Source fromhttp://computertrickworlds.blogspot.com

Google Chrome Remote Desktop BETA File sharing App


Chrome Remote Desktop BETA is the first installment on a capability allowing users to remotely access another computer through the Chrome browser or a Chromebook.
The goal of this beta release is to demonstrate the core Chrome Remoting technology and get feedback from users. This version enables users to share with or get access to another computer by providing a one-time authentication code. Access is given only to the specific person the user identifies for one time only, and the sharing session is fully secured. One potential use of this version is the remote IT helpdesk case. The helpdesk can use the Chrome Remote Desktop BETA to help another user, while conversely a user can receive help by setting up a sharing session without leaving their desk. Additional use cases such as being able to access your own computer remotely are coming soon.


Chrome Remote Desktop BETA is fully cross-platform, so you can connect any two computers that have a Chrome browser, including Windows, Linux, Mac and Chrome books.


Source fromhttp://www.techmell.info

Windows 7 Start Orb Changer v4.0


Are you get Bored with the Start Button \ Start Button in your Windows 7?

 If so, maybe this software can help relieve your bored on your Start Button. 

The name of this software is Windows 7 Start Orb Changer v4.0.

Although the size of the Windows 7 Start Orb Changer v4.0 is small, but its ability to enhance Windows inappropriate in acungi thumb. Because as long as I never use it in case of error.


Windows 7 Start Orb Changer is a freeware from door2windows that allows you to change your start orb/button with just one click in Windows 7.


To restore the original start orb click Restore.You can expand the advanced settings by clicking the arrow at the bottom right corner of the window.
Checking the Add Shortcut In Context Menu option will add an Start Orb option in the desktop context menu so that you can access the tool with one click.
Checking the Add Option In Context Menu option will add an Set As Start Orb option in the context menu of all PNG and BMP files so that you can change your start orb with one click.  


 *Windows 7 Start Orb Changer v4.0 Features:-


  • Allows you to change the orb in four different ways:

  • Context Menu

  • Drag & Drop

  • Change Button

  • Command Line (Syntax only contains orb location)

  • Works with all DPIs (If the orb is too big or too small it will automatically resize it)

  • Works with both x86/32-bit and x64/64-bit

  • Works with both PNG and BMP file formats

  • Can integrate with desktop context menu

  • Can integrate with PNG and BMP file formats' context menu

  • Allows you to change the orb in two different methods:

  • Memory Patching - Edits the start orb in memory which doesn't cause any UAC prompts

  • Resource Editing - Edits the start orb by replacing resources of%windir%\explorer.exe

  • Easy-To-Use & clean interface

  • Two modes for normal and advanced users

  • First & ultimate Windows 7 start orb changer available on the net


>> Download Windows 7 Start Orb Changer v4.0 Mediafire


Windows 7 Start Orb Changer v4.0 for Instalation Steps :

 
How To Insall :-

1) Run Program

2) click "Change"

3) Select the Start Button Image ORBs that you have saved / have -> Open

If you do not have the pictures can be downloaded for free via the link below:

Source fromhttp://www.techmell.info

Get Rid of Windows Genuine Error


This is the simplest trick through which you can easily get rid of Windows Genuine Validation error in windows (especially in windows xp).

Following three simple steps now you can get rid of the pesky and sometimes buggy Windows Genuine Advantage (WGA) notifications:


Instructions:


  • Restart Windows in safe mode (hold the f8 key while booting and you will get the option to boot in safe mode).

  • Click Start

  • Click Run

  • Type regedit

  • Press CTRL+F

  • Search for wgalogon

  • Delete it.

  • Now go to c:\windows

  • Press F3

  • Search for wga*

  • Delete them.

  • Restart your computer.


You will not get that buggy error again.


Source fromhttp://www.techmell.info

The Essential Keyboard Shortcuts to whip your Windows

Windows Shortcuts Countless books have been written on how to shortcut your way around Windows to your advantage. But in the last part of my shortcuts series, I am going to do you a big favour and only tell you a few shortcuts that I use on a daily basis to speed up my travelling around Windows XP (most should work on Vista as well).
None of them involve going anywhere near the registry or indeed altering your Windows settings in any way. What I am about to talk about is just plain old keyboard shortcuts to make menus jump up and down, windows change or make you bounce your way around the desktop – without touching that mouse once!
So….we are on the desktop. Hello Windows XP.

WIN Key

      When I start working on the computer, I mostly tend to head straight to the start menu so let’s go there. To bring up the start menu using the keyboard, just press the START key (also called the WIN key) which is normally at the bottom left of the keyboard close to the spacebar. It will have a small Microsoft symbol on it. It varies slightly in design according to what keyboard you’re using but it looks something like this :


win-key-medium.jpg
    Then once the start menu pops up, just use the arrow keys on your keyboard to choose your desired program and hit enter to run it


      Source fromhttp://www.techmell.info


Change Windows 8 Metro UI To Windows 7 Start Menu

The developer preview for Microsoft’s next operating system has been released. Windows 8 boasts new UI features such as the new Start screen, Ribbon UI, new lock screen, and more. As per earlier speculation, Microsoft has indeed removed the start menu from the new version of windows.

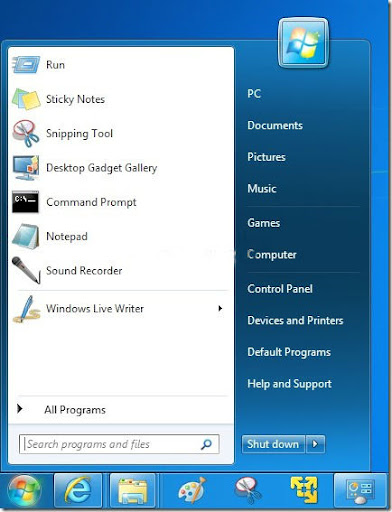
Start Menu

If this new change is tough to you as to most users then do not despair. There is a way to get the start menu back in the new OS. For this we will have to edit the Windows registry to get the classic menu back. Although free utilities like ViStart are available for this very purpose, here I shall describe the very best and most robust way to achieve this.

Start Menu in the new OS

[adsense]

Steps To Enable Start Menu in Windows 8


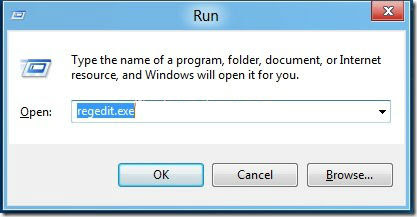
Step 1: Access the Run program by hitting Windows + R and type in regedit.exe and then hit Enter key to launch the Registry Editor.

Run

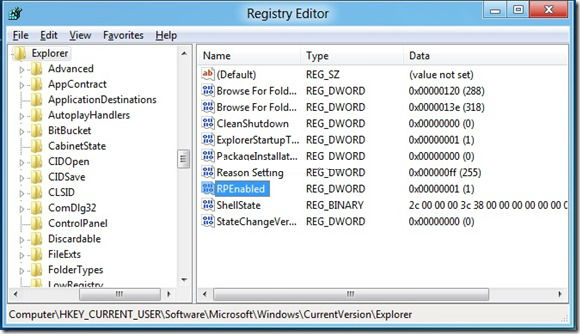
Step 2: Locate the following key in the Registry editor:

HKEY_CURRENT_USERSoftwareMicrosoftWindowsCurrentVersionExplorer

Registry Editor

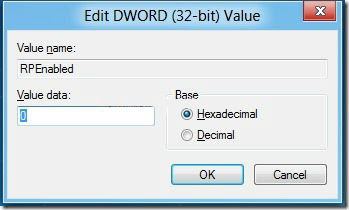
Step 3: There in the right pane you will see an option RPEnabled, double click it and change its value from 1 to 0 to revert your preference to the older style windows 7 start menu.

Edit DWORD

That’s all to it. If you wish to have the new styles back then simply navigate to the key and set the previously modified value to 1 again. Once you revert to the older style menu the new metro ui orb disappears replaced by the older windows logo.

If this method not working for you then try these different methods to disable and customize windows 8:


Source fromhttp://rdtrick.blogspot.com
 
Support : Creating Website | Johny Template | Mas Template
Copyright © 2011. ... - All Rights Reserved
Template Created by Creating Website Published by Mas Template
Proudly powered by Blogger